Enhancing Your Frontend Workflow
For OSR & Email Development
by Anthony O'Neill
githubIntroduction
The only constant in life is change and a topical example of this is in the tech world. Hardware and software change at such a rapid pace that it can easily feel futile to try and keep on top of current trends. Artificial Intelligence, Virtual Reality, Quantum Computing, The Cloud, Driverless electric cars with awesome vertical opening doors, Wearable Tech, 3D Printers, Bio Printers, DNA Sequencing, Voice (Thumb, Face and probably bum) Recognition, Google Contact Lense, Internet Beamed From Space, and of course at the very cutting edge we have Email and OSR development solutions.
My aim is to help you clear the hurdles and attempt to demystify the technologies involved in getting you up and running with a workflow that will increase your speed and quality of your code.
The Console
↓
$ cd wtf/is_going_on
Often portrayed in media as the satanic portal hackers go to sacrifice your stolen credit card information or where the lay accidentally wipe their hard drive when trying to look up their IP settings; the Terminal is forgivably seen as an unwelcoming environment. And, to be fair, speaking from our designer perspective it does look like shit as if it were a hangover from the the 80's. But it ain’t all about looks or breaking the law, the Terminal allows you to traverse the contents of your computer with speed together with the ability to launch applications, create folders and files, and run applications.
If this is all new to you see below to get started.
↓
Visit https://github.com/git-for-windows/git/releases/tag/v2.6.1.windows.1 and follow the these steps


Find Git Bash in your Programs Folder

There is a lot you can do with bash but we’ll only go over some useful basics. Type ‘help’ and hit return to find a list of available commands.
$ help
Give yourself some room to see where you’re typing by typing ‘clear’.
$ clear
At any point in time the bash is operating in a particular directory on your computer. Type ‘ls’ to list the contents of that directory in the console.
$ ls
To move to a folder simply use the change directory command ‘cd’ followed by the folder name. If the folder is present in your current directory you can get to it like this.
$ cd Desktop
Or you can use the tilde ‘~’ with the directory and get to it from any directory!
$ cd ~/Desktop
A way to make this process faster is to use the tab key after you have typed enough letters to narrow down the possibilities. So in our example typing ‘des’ and then tab will return ‘Desktop’.
Now that we’re in our folder of choice we can create a folder with the make directory command ‘mkdir’ followed by the name of the folder.
$ mkdir MyProject
Check your desktop and you should now see the folder that you’ve just made in the console.
To create a file we use the touch command followed by the file name and extension. In this scenario we’ll be making a .css file to use later so we’ll create a css folder and then a styles.css file.
$ cd MyProject
$ mkdir css
$ cd css
$ touch styles.css
Sublime Text
↓
Everyone who programs will have a favourite text editor and there is a lot of choice out there as well as a lot of opinion on what is better or worse. My favourite is Sublime Text because it’s lightweight, looks pretty, and most importantly it has a large community of developers who create really useful plugins that work as a great enabler in improving your speed and code quality. This short walkthrough will allow you to launch your projects and install plugins in Sublime with ease.
To install Sublime Text visit http://www.sublimetext.com/3
The following steps will enable you to launch projects from the console like this;
$ subl MyProject
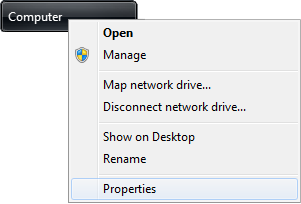
Firstly, after installing Sublime Text go to your start menu and right click Computer>Properties
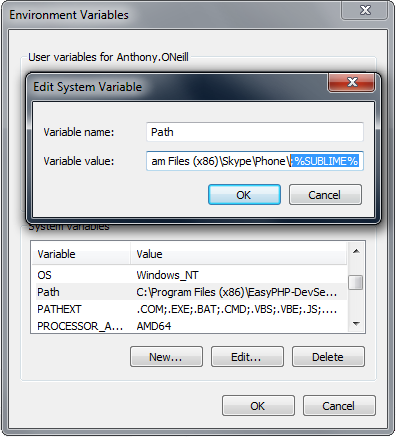
On the inside right of the properties window click on 'Advanced System Settings'

At the bottom of the new window you should see a button labelled 'Enviroment Variables'. Click on it.

Create a new System Variable 'SUBLIME' with the value of the path of the application.

Find the Path variable in the System Variables section (bottom) and append ;%SUBLIME% to the variable value.
Close down your Git Bash terminal and start it up again get the path of your project and enter.
$ subl
Didn't work? Try restarting your computer or make sure your variable path goes to the correct directory of Sublime Text.
Sublime Packages
↓
Sublime Text has a very large and active community of developers who craft and maintain packages that enhance the experience of using Sublime.
In the next couple of steps we'll go over the installation of a Package Manager and the installation of a package for Sass.
↓
Create a sass directory with a styles.scss file
$ cd ~/Desktop/MyProject
$ mkdir sass
$ cd sass
$ touch styles.scss
$ subl styles.scss
Add some simple sass code in your styles.scss
div {
	h1 {
		font-size: 42px;
	}
}
The syntax highlighting isn't working like it would with css so we need to install a Sublime Package correctly highlights our scss.
Go to https://packagecontrol.io/installation and follow the installation instructions
Now press ctrl+shift+P and type Package Control Install Package

Then go to Syntax Highlighting for Sass

Close your styles.scss file and re-open it. You should now have highlighted sass files
div {
	h1 {
		font-size: 42px;
	}
}
Node.js
↓
Javascript
The desire to bring interactivity to the web was present from the early days of web browsing; Java applets were the programmers choice of the time and had key advantages of being able to access hardware accelerators for graphics, but they were blind to the rest of the DOM and users had to sometimes download hefty plugins that felt like more stress than it was worth over what was then a painfully slow dialup connection.
JavaScript, not to be confused with Java as they are entirely separate, was first released into the wild in 1995 with the Netscape Navigator browser and over the last 20 years it has been subject to major iterations which has lead to wider adoption and is now seen as the language of the web and is now becoming a popular server side language. Due to its huge popularity major frameworks and libraries have emerged with active communities allowing programmers to more easily create big web applications and games.
Node.js
Javascript has seen an increase in use on the server in recent years with Node.js and IO.js being used by many developers. This adoption has helped create a huge library of tools you can use with Node.js to improve your development workflow. A tool we'll be using is a Javascript task runner that allows you to automate many tasks such as autoprefixing CSS, compiling SASS, minifying CSS, image compression, uglifying your code and many other things that you'll soon find out about.
Visit http://www.nodejs.org and download Node.js following the steps below for installation


Go to your console and test to see if node is installed.
$ node -v
That should return the version of node that's installed. Now run the following command.
$ npm -v
This returns the version of npm (Node Package Manger, or going by the npm team it doesn't stand for anything) that comes with node. It allows you to install node packages directly from the console and into your projects. Visit npmjs.com to see what's available. Each package will have a page with a link to the github repo and the set of instructions to get you started with the package.
Before we install any packages it is best practise to create a package.json file to track all of the packages you are using. This is useful for updating your packages and for not having to upload all of your project’s packages to github as they will be referenced in your package.json meaning they are only stored on your local drive saving you time on having to upload and download. To create your package.json run the following command.
$ npm init
The console will prompt you with a series of questions. You can choose to leave most of them blank if you don’t know what to enter though I encourage you to search to find out what each one means as they become more relevant when building applications. A good start would be looking into semantic versioning, check out this article on the subject here.x
Go to the next section where we will install our first package which will be Javascript Task Runner Gulp.